Showing posts with label fruit. Show all posts

Tuesday, 26 November 2013

Homebrew update

I have decided to write a blog to update a few of the brews I have going at the minute. I currently have a batch of cider, elderberry wine, blackberry wine and my batch of porter I wrote a blog about a few days ago.

Homemade demijohn
First off is the cider I started brewing in late October. Once the fermentation had run its course, which took about a week I moved the cider from the fermenters into demijohns. I have a few demijohns which my dad had from his wine making days. I needed more for this batch of cider though so I used some 5 litre water bottles to make my own demijohns.

The cider went into these under airlock to allow them to ferment out without the dead yeast cells and general sludge left after the first fermentation, affecting the flavour. I stored the bottles beside a radiator to allow them to ferment out all the sugars so I could then store them without fear of the bottles exploding.


Cider transfered into the demijohns

Lined up beside the radiator


Once the bubbles had stopped coming through the airlocks I knew fermentation was finished. I then waited for the cider to clear. For this they need somewhere cool. I moved them away from the radiator and they cleared in about 2 weeks.

Cleared cider


Once clear I moved them to the attic. They will be kept cool there and they will age for a few months. I had a sneaky taste and it was very bitter. This may lessen with aging. If it doesn't mellow by the spring I will sweeten the cider using an unfermentable sugar. I had expected the cider to be quite bitter as I used mostly cooking apples so I am not too worried about that.


Next up are the blackberry and elderberry wines which I started in early October. After 4 days both wines were strained and transfered into demijohns to finish fermenting without the fruit and pulp. They both bubbled away for a few days in the demijohns. I'm not sure quite how long as I left them to ferment and clear for about a month. When I came back to check them I had two very different results.

The blackberry wine had stopped fermenting before all the sugars had turned to alcohol. This left me with a "wine" with about 7% alcohol and it was very sweet. This is a problem with some brews known as a stuck fermentation. It has a few fixes like shaking up the brew, adding yeast nutrient and moving to a warm place. I tried all these and it had little or no effect. Sometimes fermentation stops due the high level of alcohol killing off the yeast. I had a packet of Turbo Yeast. It says it can ferment up to 20% alcohol so I have added that to the wine to see if it can ferment out the last of the sugar and give me a 13% wine with no sugar left. It is quite expensive as yeast goes. I think it cost 6 euro or so.  Finger crossed it gets the job done.

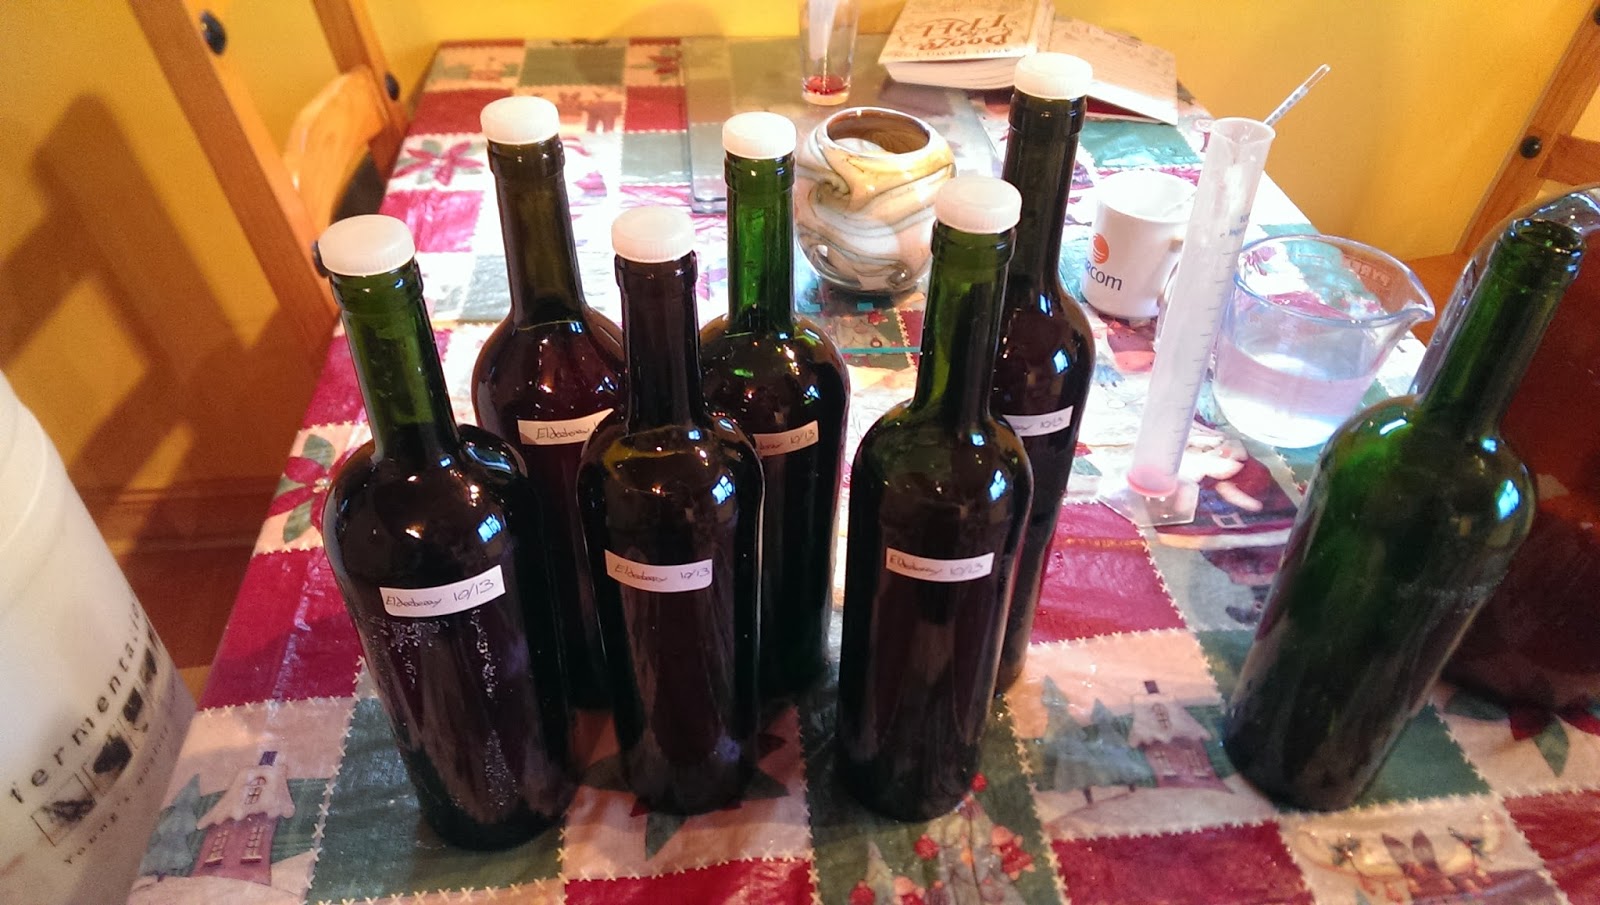
The elderberry wine was much more successful. I tested a sample of the wine and it had zero sugar left in it. The percentage alcohol is about 12%. I had a sneaky taste (as I like to) and it was nice. A bit like a light red wine. Apparently elderberries have a lot of tannins in them which benefit from aging. So going by that reasoning the wine should improve with time in the bottle. That's if it lasts that long. I transfered it into wine bottles and put plastic stoppers into them. I was considering blending some of it with the blackberry wine so I haven't put proper corks in the bottles yet. Having tasted it I will definitely want to keep some unblended to age so I will be putting proper corks in some of these bottles.


That's most of the homebrew taken care of. Today I took a sample of the porter and it has pretty much fermented out and cleared so it will be ready to bottle soon. I also had a sneaky taste (have you noticed a pattern?) and it tasted lovely. Not just as a homebrew, it tasted like a good craft beer. So I am feeling optimistic about this batch. I will put up a post about bottling it when the time comes.

Until Then.

Wednesday, 23 October 2013

Cidermaking

After getting my cider press built and up and running it was time to finally process my apples. I got my friend Tom up as photographer /glamorous assistant /slave labour. I had collected some of the apples back in September so there were a few gone black and unusable. The apples that were up to standard were first crushed so they are easier to extract the juice from. I have seen machines designed for this but we used a more rustic method involving a plastic box and a piece of 4x2. We broke up the first batch reasonably well, making sure each apple was broken. Later batches we broke up a lot more so the apples were in a rough pulp. This made it easier to extract juice and we got a better overall quantity of juice as well.

Crushing apples


Once we had our pulp we transfered it to the bucket, which we had lined with a filter bag. When I designed the press I had allowed for a very large bucket but the one I found was a little smaller. It will allow me to adjust the press if I need to process larger amounts of apples so it is a good thing really. But while using it this time I had to put extra bits of timber under the bucket to raise it up and put more timber than I would have liked under the jack to that it would push the plunger down onto the apples.

If the bucket was bigger we wouldn't need so many timbers.

This made the post in the middle much less stable. After the jack becoming airborne once or twice, I decided for health and safety reasons it was probably better to stabilise the centre post. To do this I added two pieces of 2x1 to stop the centre post moving off centre when pressure was applied. This made everything much more stable and once this was done we had no more "health and safety issues."

The angle on the centre post before the changes were made


The two "runners" added to keep the post from slipping

After we had everything stabilised it was a matter of getting down to pressing the apples. At first we tried using a hydraulic trolley jack but it was too big to use. We then used a scissors jack from a Nissan Micra which was a better size for the press. Once we got into our rhythm of crushing, filling, pressing and emptying we got through a good few sacks of apples.


The left over apples

 After we were finished we had that wheelbarrow over flowing with left over apple mush. It made me wish I had the pigs back this year, they would have made light work of that lot. I will have to wait until I have the pigs back next year to make use of left overs, this lot is destined for the compost heap. In the end we had 30 litres of juice. 10l was from apples I got from a friends' grandfather and the other 20l was from a mix of apples from friends, people from work and that kind of thing.

The 20l batch of juice

I decided to keep the two batches seperate to allow me a bit more control over the flavour by blending the two together to get my final product. I also have two sacks of crab apples and a few apples from the garden to make into seperate batches to allow me to blend them together. I chose to add sulphite to my cider. This was to kill of bacteria and wild yeasts in the juice which should prevent spoilage and allow me to add my own yeast which should be more reliable. Some people don't like to add sulphites but I didn't want to risk ending up with 60l of vinegar. I did this on Tuesday night after collecting all the juice and then left them until Wednesday morning so the sulphites could do their work.

Wednesday morning I put my two batches into the fermenters. I measured the pH levels of each juice and they were each 2.8. The ideal range for cider is 3.2 - 3.8. After struggling to remember about the pH scale and whether acidity is high or low I realised I needed to lower the acidity. The acidity can be higher depending on the amounts of cooking apples you use, and I did use mostly cooking apples so I kind of expect this to happen. To lower the acidity you can add precipitated chalk. It is a calcium based powder which I bought from a homebrew shop. I added a teaspoon per gallon which brought the pH level to about 3.1 which was close enough for me. I then activated my yeast in warm water with yeast nutrient. I also added pectolase to reduce the chance of haze in my cider due to the pectin in the apples. I then added the yeast to the juice and left it to do it's work.


40l of cider, blackberry wine, elderberry wine, 20l of cider

Now I have to wait until the fermentation begins, it has been about 10 hours since I added the yeast and there might be a few small bubbles starting to form. Hopefully by the morning I will have full fermentation. I will post when I am taking on the next step with the cider which will be racking the cider, siphoning it off the dead yeast and sludge at the bottom of the fermenter and moving it to finish the fermentation in another container.

EDIT: Here is an update on the cider

Until Then.

Monday, 21 October 2013

Building my cider press


So I finally got around to finishing the cider press. I didn't have a design as such, more a few pictures of what someone else did and from that I put together a design. I got my ideas from this post. He shows pictures and the parts to his cider press and I used these pictures to make my own.

I had spotted a piece of 6x2 that had been stored under the decking for the last couple of years. It was fairly dirty and was covered in grime. So once I cut it into the 6 pieces I wanted, I gave it a planing and sanding to get clean it up.


6x2 before

 
6x2 after

When the 6x2s were tidied up I then bolted them front and back to the 4x2 uprights.

I then added supports to allow the frame to stand up. I used 4x2 for this also.


It was around this point I realised I may have been a little over ambitious with the size of the design. It is 8ft tall and 2ft wide. Well at least if I decide to start up a cider making business I have the cider press for it. The next step was to add the rails for the bucket to sit on. For this I chiseled out a notch in the 6x2 and in the rail itself to make them fit together. I think this is the first time I have used a chisel since woodwork in school but I still have all the skills.


The notches to be cut from the rail

I don't seem to have a picture of the rails in place. It has nothing whatsoever with the quality of the joint, it all fit perfectly, I swear . . . .

Next it was onto the tray that sits on the rails. I made it from 18mm ply and 3x2 sides. It was made to fit snugly between the uprights and to be sturdy enough to take the weight when pressing the apples.

The plywood and 3x2s for the sides

The tray assembled and resting on the rails

Inside the tray I wanted a way for the juice to run out of the bucket and all run to one side of the tray and out a hole and into a bucket underneath. For this I built a frame out of 2x1 to allow the juice to flow through. This is hard to explain in words but the pictures should make it easier to understand.

One layer of 2x1s (see that they are not full length)


The second layer screwed onto the first layer

This is removable to make it easier to wipe inside the tray.

This 2x1 framing allows juice to flow into the tray by raising the bucket off the plywood base. The frame doesn't go all the way to the end of the tray so the juice can escape out the hole. You can see what I mean below

The hole to allow the cider out

The tray with hole and frame

The 2x1s are left a little short to allow the juice out

I found an old homebrew bucket in the attic to use to hold the apple pulp while pressing. It was a little battered but was perfect for the job. I then measured the diameter at the bottom of the bucket and cut out a circle(ish) of plywood to use as the pressing plate. I then drilled holes into the base and sides of the bucket with a hole saw. I didn't want them too close incase they weakened the bucket.

My "circular" pressing plate

The bucket had slightly tapered sides so the plate is a little loose at the top but I don't think that should matter too much. The pressure will still be applied to most of the pulp and we can move it around a bit if needs be. I attached the plate to another 4x2 that runs through the middle of the press and transfers the pressure onto the apples.

Quite a good fit

The holes in the bottom of the bucket

I added holes to the side of the bucket to allow the juice to flow out more easily. I also added a plate to the top of the center post. This is where the hydraulic jack will sit and push against the top of the frame. This should apply pressure onto the apples and get the juice flowing into a bucket underneath.

The plate on top for the hydraulic jack


So that's my cider press. I haven't tested it out yet, I have poured water into the tray and it flows out the hole as I would like and it seems pretty water tight along all the other joints. So tomorrow I should get to test it out properly with some apples and hopefully plenty of juice. Hopefully I should have that blog up tomorrow evening, or if not, the next day.

Until Then


Sunday, 29 September 2013

My garden as it stands


I decided for my first blog post I would give a few pictures of my garden to have a starting point so the blog can follow it along as it changes. First off is the polytunnel, I decided to clear out all of this years crops today to make room for some winter salad crops. I found a few bits and pieces while clearing out so they are currently forming a chutney on the hob, the greenery went to the hens and compost pile.

The tunnel this morning

The tunnel this evening

I have already cleared our two raised beds of onions and half of the deeper bed of carrots. The parsnips are still there I will probably leave them there for another month or so, until the weather gets a bit colder. We have put in a few lettuce plants after the onions, probably too many to eat but the hens will get the rest. Here is a picture of the three beds. The parsnips are in the far bed as that is the deeper one. 


This year we made use of the additional growing space in what was the pig run last year. It will have pigs again next year, we decided to take a break from pigs for a year but I can't wait to get them back next spring. I have enjoyed the extra space for growing though so we will need to see if we can find extra space for growing veg next year. This year we grew potatoes, runner beans, peas, sweetcorn, brussel sprouts, swedes, broccoli, purple sprouting broccoli and cauliflower in the pig run. So I will really miss the space next year. I might have to build a few more raised beds next year.

The end of the pig run where the potatoes were

The pig run with mostly winter veg left

Beside the pig run we have the hen house and hen run. This is where we keep the laying flock of hens and ducks. We currently have 9 hens and 4 ducks. I have plans to add the breeding birds from the meat flock in here over winter to save the grass in the garden, and to make it easier for feeding.

Hens and ducks from the laying flock

The hen house, freshly cleaned today (kind of why I included the picture)


This was my first year keeping chickens for meat. I got 12 day old La Bresse in May, it turned out to be 7 cockerels and 5 hens. I kept them under heat until they were ready to go outside. I set up a pen with electric poultry netting on the lawn. I moved this around so the grass didn't get too worn anywhere. 3 of the cockerels are now residing in the freezer, so there is now 5 hens and 4 cockerels in the pen. I plan to keep the 5 hens and 2 of the cockerels for breeding next year. I will probably put them in with the laying hens over winter and seperate them in the spring for breeding. Otherwise I think the grass will turn to mud. I might use the electric poultry netting to let them out on some grass when the weather allows.

Some of the La Bresse in their electric netting run

 Today I also took in my harvest of cooking apples. This was mainly because I needed them for the chutney recipe. This was about 1 kg of apples haha. Well I did only plant the trees this spring so I am not too disappointed about that. I planted one bramley apple tree, one gala apple tree, two cox's orange pippin trees, two plum trees (one died), and I also have two pear trees which are in pots at the minute as I haven't cleared the ground for them just yet. There is also a crab apple tree beside the shed.
The Fruit Trees

Well that seems to cover most of the garden, I did say it was crowded! That is about it for today. I will probably be picking some elderberries during the week to make wine. I will probably make a blackberry wine, an elderberry wine and maybe a blend if I have enough fruit. 

Until then.