So I finally got around to finishing the cider press. I didn't have a design as such, more a few pictures of what someone else did and from that I put together a design. I got my ideas from
this post. He shows pictures and the parts to his cider press and I used these pictures to make my own.
I had spotted a piece of 6x2 that had been stored under the decking for the last couple of years. It was fairly dirty and was covered in grime. So once I cut it into the 6 pieces I wanted, I gave it a planing and sanding to get clean it up.
 |
| 6x2 before |
 | | |
| 6x2 after |
When the 6x2s were tidied up I then bolted them front and back to the 4x2 uprights.
I then added supports to allow the frame to stand up. I used 4x2 for this also.
It was around this point I realised I may have been a little over ambitious with the size of the design. It is 8ft tall and 2ft wide. Well at least if I decide to start up a cider making business I have the cider press for it. The next step was to add the rails for the bucket to sit on. For this I chiseled out a notch in the 6x2 and in the rail itself to make them fit together. I think this is the first time I have used a chisel since woodwork in school but I still have all the skills.
 |
| The notches to be cut from the rail |
I don't seem to have a picture of the rails in place. It has nothing whatsoever with the quality of the joint, it all fit perfectly, I swear . . . .
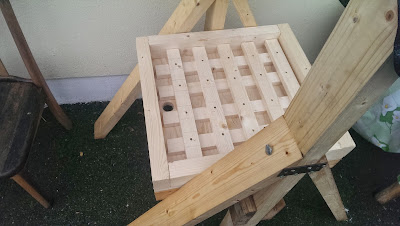
Next it was onto the tray that sits on the rails. I made it from 18mm ply and 3x2 sides. It was made to fit snugly between the uprights and to be sturdy enough to take the weight when pressing the apples.
 |
| The plywood and 3x2s for the sides |
 |
| The tray assembled and resting on the rails |
Inside the tray I wanted a way for the juice to run out of the bucket and all run to one side of the tray and out a hole and into a bucket underneath. For this I built a frame out of 2x1 to allow the juice to flow through. This is hard to explain in words but the pictures should make it easier to understand.
 |
| One layer of 2x1s (see that they are not full length) |
 |
| The second layer screwed onto the first layer |
 |
| This is removable to make it easier to wipe inside the tray. |
This 2x1 framing allows juice to flow into the tray by raising the bucket off the plywood base. The frame doesn't go all the way to the end of the tray so the juice can escape out the hole. You can see what I mean below
 |
| The hole to allow the cider out |
 |
| The tray with hole and frame |
 |
| The 2x1s are left a little short to allow the juice out |
I found an old homebrew bucket in the attic to use to hold the apple pulp while pressing. It was a little battered but was perfect for the job. I then measured the diameter at the bottom of the bucket and cut out a circle(ish) of plywood to use as the pressing plate. I then drilled holes into the base and sides of the bucket with a hole saw. I didn't want them too close incase they weakened the bucket.
 |
| My "circular" pressing plate |
The bucket had slightly tapered sides so the plate is a little loose at the top but I don't think that should matter too much. The pressure will still be applied to most of the pulp and we can move it around a bit if needs be. I attached the plate to another 4x2 that runs through the middle of the press and transfers the pressure onto the apples.
 |
| Quite a good fit |
 |
| The holes in the bottom of the bucket |
I added holes to the side of the bucket to allow the juice to flow out more easily. I also added a plate to the top of the center post. This is where the hydraulic jack will sit and push against the top of the frame. This should apply pressure onto the apples and get the juice flowing into a bucket underneath.
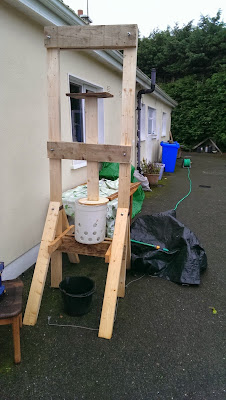 |
| The plate on top for the hydraulic jack |
So that's my cider press. I haven't tested it out yet, I have poured water into the tray and it flows out the hole as I would like and it seems pretty water tight along all the other joints. So tomorrow I should get to test it out properly with some apples and hopefully plenty of juice. Hopefully I should have that blog up tomorrow evening, or if not, the next day.
Until Then


No comments:
Post a Comment