Thursday, 31 October 2013

Homegrown vegetable stock mix

My 4 jars of vegetable stock mix
When making soups, stews, sauces etc. it is handy to be able to add a bit of stock to add more flavour. The stock cubes you buy in the shops are full of additives and preservatives, and it can be time consuming to make your own stock from scratch. This is where vegetable stock mix comes in. I first read about it in the "River Cottage Preserves Handbook." You use it pretty much the same way you would a stock cube, just add 2tsp of the mix to a pint of boiling water and you have a full flavoured vegetable stock.

Making the mix is very straightforward once you have a food processor or a blender. The ingredients for this mix are pretty flexible. I have chosen these because they are the vegetables we grew this year and I wanted to make it as homegrown as possible. You can use whatever vegetables are in season, on special in the supermarker or you have lying in the fridge. Just try to keep the veg to salt ratio about the same and you should be fine. The salt preserves the vegetables to stop them going off so if you increase the amount of veg increase the amount of salt proportionately. For my mix I used:

Some of my veg for the mix
250g of leek
200g of onion
200g of carrot
200g of turnip
100g of runner beans
A few sun dried tomatoes
A few cloves of garlic
A bunch of parsley, thyme and sage
250g of salt


The method for this recipe is simple. Roughly chop your selection of veg and put it into a food processor. Blend the veg until it is a grainy paste like consistency. I put in the veg in stages because it wouldn't all fit in at once.

From this

To this

Then add the salt and herbs to the mix and blend again until all thoroughly mixed and blended together. Then put this mix into sterilised jars. This should keep for 6 months in a cool dry place. I normally keep a one jar in the fridge and store the others at the back of the press somewhere. When using the mix, do so before seasoning, then taste the soup or sauce after adding it because there is a lot of salt in the mix and you usually don't need to season it any further.

This recipe is very easy to do and you probably only need to do it twice or three times a year to keep yourself in homemade stock that isn't full of artificial flavours and preservatives.

Wednesday, 23 October 2013

Cidermaking

After getting my cider press built and up and running it was time to finally process my apples. I got my friend Tom up as photographer /glamorous assistant /slave labour. I had collected some of the apples back in September so there were a few gone black and unusable. The apples that were up to standard were first crushed so they are easier to extract the juice from. I have seen machines designed for this but we used a more rustic method involving a plastic box and a piece of 4x2. We broke up the first batch reasonably well, making sure each apple was broken. Later batches we broke up a lot more so the apples were in a rough pulp. This made it easier to extract juice and we got a better overall quantity of juice as well.

Crushing apples


Once we had our pulp we transfered it to the bucket, which we had lined with a filter bag. When I designed the press I had allowed for a very large bucket but the one I found was a little smaller. It will allow me to adjust the press if I need to process larger amounts of apples so it is a good thing really. But while using it this time I had to put extra bits of timber under the bucket to raise it up and put more timber than I would have liked under the jack to that it would push the plunger down onto the apples.

If the bucket was bigger we wouldn't need so many timbers.

This made the post in the middle much less stable. After the jack becoming airborne once or twice, I decided for health and safety reasons it was probably better to stabilise the centre post. To do this I added two pieces of 2x1 to stop the centre post moving off centre when pressure was applied. This made everything much more stable and once this was done we had no more "health and safety issues."

The angle on the centre post before the changes were made


The two "runners" added to keep the post from slipping

After we had everything stabilised it was a matter of getting down to pressing the apples. At first we tried using a hydraulic trolley jack but it was too big to use. We then used a scissors jack from a Nissan Micra which was a better size for the press. Once we got into our rhythm of crushing, filling, pressing and emptying we got through a good few sacks of apples.


The left over apples

 After we were finished we had that wheelbarrow over flowing with left over apple mush. It made me wish I had the pigs back this year, they would have made light work of that lot. I will have to wait until I have the pigs back next year to make use of left overs, this lot is destined for the compost heap. In the end we had 30 litres of juice. 10l was from apples I got from a friends' grandfather and the other 20l was from a mix of apples from friends, people from work and that kind of thing.

The 20l batch of juice

I decided to keep the two batches seperate to allow me a bit more control over the flavour by blending the two together to get my final product. I also have two sacks of crab apples and a few apples from the garden to make into seperate batches to allow me to blend them together. I chose to add sulphite to my cider. This was to kill of bacteria and wild yeasts in the juice which should prevent spoilage and allow me to add my own yeast which should be more reliable. Some people don't like to add sulphites but I didn't want to risk ending up with 60l of vinegar. I did this on Tuesday night after collecting all the juice and then left them until Wednesday morning so the sulphites could do their work.

Wednesday morning I put my two batches into the fermenters. I measured the pH levels of each juice and they were each 2.8. The ideal range for cider is 3.2 - 3.8. After struggling to remember about the pH scale and whether acidity is high or low I realised I needed to lower the acidity. The acidity can be higher depending on the amounts of cooking apples you use, and I did use mostly cooking apples so I kind of expect this to happen. To lower the acidity you can add precipitated chalk. It is a calcium based powder which I bought from a homebrew shop. I added a teaspoon per gallon which brought the pH level to about 3.1 which was close enough for me. I then activated my yeast in warm water with yeast nutrient. I also added pectolase to reduce the chance of haze in my cider due to the pectin in the apples. I then added the yeast to the juice and left it to do it's work.


40l of cider, blackberry wine, elderberry wine, 20l of cider

Now I have to wait until the fermentation begins, it has been about 10 hours since I added the yeast and there might be a few small bubbles starting to form. Hopefully by the morning I will have full fermentation. I will post when I am taking on the next step with the cider which will be racking the cider, siphoning it off the dead yeast and sludge at the bottom of the fermenter and moving it to finish the fermentation in another container.

EDIT: Here is an update on the cider

Until Then.

Monday, 21 October 2013

Building my cider press


So I finally got around to finishing the cider press. I didn't have a design as such, more a few pictures of what someone else did and from that I put together a design. I got my ideas from this post. He shows pictures and the parts to his cider press and I used these pictures to make my own.

I had spotted a piece of 6x2 that had been stored under the decking for the last couple of years. It was fairly dirty and was covered in grime. So once I cut it into the 6 pieces I wanted, I gave it a planing and sanding to get clean it up.


6x2 before

 
6x2 after

When the 6x2s were tidied up I then bolted them front and back to the 4x2 uprights.

I then added supports to allow the frame to stand up. I used 4x2 for this also.


It was around this point I realised I may have been a little over ambitious with the size of the design. It is 8ft tall and 2ft wide. Well at least if I decide to start up a cider making business I have the cider press for it. The next step was to add the rails for the bucket to sit on. For this I chiseled out a notch in the 6x2 and in the rail itself to make them fit together. I think this is the first time I have used a chisel since woodwork in school but I still have all the skills.


The notches to be cut from the rail

I don't seem to have a picture of the rails in place. It has nothing whatsoever with the quality of the joint, it all fit perfectly, I swear . . . .

Next it was onto the tray that sits on the rails. I made it from 18mm ply and 3x2 sides. It was made to fit snugly between the uprights and to be sturdy enough to take the weight when pressing the apples.

The plywood and 3x2s for the sides

The tray assembled and resting on the rails

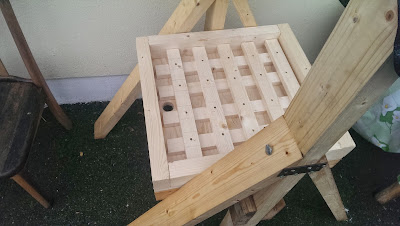
Inside the tray I wanted a way for the juice to run out of the bucket and all run to one side of the tray and out a hole and into a bucket underneath. For this I built a frame out of 2x1 to allow the juice to flow through. This is hard to explain in words but the pictures should make it easier to understand.

One layer of 2x1s (see that they are not full length)


The second layer screwed onto the first layer

This is removable to make it easier to wipe inside the tray.

This 2x1 framing allows juice to flow into the tray by raising the bucket off the plywood base. The frame doesn't go all the way to the end of the tray so the juice can escape out the hole. You can see what I mean below

The hole to allow the cider out

The tray with hole and frame

The 2x1s are left a little short to allow the juice out

I found an old homebrew bucket in the attic to use to hold the apple pulp while pressing. It was a little battered but was perfect for the job. I then measured the diameter at the bottom of the bucket and cut out a circle(ish) of plywood to use as the pressing plate. I then drilled holes into the base and sides of the bucket with a hole saw. I didn't want them too close incase they weakened the bucket.

My "circular" pressing plate

The bucket had slightly tapered sides so the plate is a little loose at the top but I don't think that should matter too much. The pressure will still be applied to most of the pulp and we can move it around a bit if needs be. I attached the plate to another 4x2 that runs through the middle of the press and transfers the pressure onto the apples.

Quite a good fit

The holes in the bottom of the bucket

I added holes to the side of the bucket to allow the juice to flow out more easily. I also added a plate to the top of the center post. This is where the hydraulic jack will sit and push against the top of the frame. This should apply pressure onto the apples and get the juice flowing into a bucket underneath.
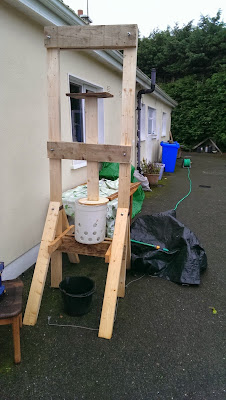
The plate on top for the hydraulic jack


So that's my cider press. I haven't tested it out yet, I have poured water into the tray and it flows out the hole as I would like and it seems pretty water tight along all the other joints. So tomorrow I should get to test it out properly with some apples and hopefully plenty of juice. Hopefully I should have that blog up tomorrow evening, or if not, the next day.

Until Then


Tuesday, 15 October 2013

Killing Cockerels and Future Poultry Plans

In May I bought 12 day old La Bresse chicks. They grew on to 7 cockerels and 5 hens. My plan is to breed from these birds and produce a batch or two of meat birds each year. I killed 3 of the cockerels and put them into the freezer two weeks ago. We ate one last week and it tasted great. There was lots of leg and thigh meat and a reasonable amount of breast meat. The dark meat was very dark and had a nice dense quality, not like the pumped with water supermarket birds. I was very pleased with the finished quality.

Saturday we decided we would slaughter two more cockerels the following day. That leaves us with 5 hens and 2 cockerels for breeding next year. I am keeping two cockerels as a back up plan in case one of the cockerels gets sick or is in fertile etc.. We seperated the two chosen cockerels after dark on Saturday night and kept them on tarmac with water and no food so as to clear their crops and digestive systems to make cleaning them out easier.

The chosen two

Sunday afternoon we got around to doing the job. When originally deciding on a method to dispatch the birds I chose the "cone method." It seemed the most humane and straightforward method to me. The first time I slaughtered the birds I did a batch of three. The first bird didn't go as smoothly as I would have liked but once I had learned the method I was happier with the other two. If I had just planned on killing one bird I would have dreaded doing the next batch a few days later but I am glad there was more birds to do straight away so I could get it right. This time around I felt much better about doing the job. It also helped to have two hunting friends to give me advice on the plucking and gutting. I took a video of the job and our homemade cone. I am not claiming this is the "best" method available it is simply how I chose to do it and it is open to criticism and comment. The bird is placed head first down into the cone and his head is then pulled through the bottom of the cone. I then pull the feather back to reveal the birds throat. I then make a cut each side of the neck to sever the two arteries on either side of the neck. The bird then bleeds out into a bucket. The bird should pass out from blood loss in 2 or 3 seconds and then die in 5 to 10 seconds. The bird normally makes one last "squak" and then flaps around in the cone. Once this happens the bird is dead and I usually leave the bird in the cone for about 30 seconds to make sure all the flapping is done with and then remove the bird. I also put a piece of wood into the top of the cone to make sure the bird doesn't flap it's way out of the cone. This is a video of a chicken being killed so if that will upset you don't watch it.


The laughing and noise you can hear is because the bird we slaughtered before this one started flapping (you can see it in the background) even though it was already dead and gave some of us a bit of a shock. I just wanted to make it clear no one was laughing about killing the bird or anything like that.

Now that I am left with my 5 hens and 2 cockerels from my meat birds I have moved them in with the laying flock for the winter. This will save the grass I had them on and also make feeding easier when the evenings start to get darker. They seem to be getting on okay. Not much bullying etc at the moment so hopefully it will stay that way. Next year I plan to seperate out the birds for breeding and hopefully set 2 batches of 24 eggs in an incubator. One batch in the spring and hopefully by the time they are out on the grass, I can set a few more into incubator and bring them on until it is time for the first batch to be slaughtered. Then the second batch can go out on the grass and maybe they will be ready to go about this time next year. Well that's the plan anyway but we will have to wait and see how that works out.

I have an update to make on my wines and prosciutto which hopefully I will get to put up later in the week.

Until then.

Wednesday, 2 October 2013

Elderberry Wine and Prosciutto

Sounds very fancy doesn't it? Well I finally got around to picking my elderberries, in the rain, nothing fancy about that. I had already picked some blackberries last week and put them in the freezer. So I took them out last night and this morning I got down to making some elderberry wine and some blackberry wine.


The kitchen takeover

I got my recipe from Andy Hamilton's "Booze for Free." His recipe is for a blend of elderberry and blackberry wine. I decided to make two separate batches to try them on their own and blended together. The recipe is as follows:

2kg of elderberries/blackberries
1.5kg of sugar
4litres of water
Juice of one lemon
1tsp of pectolase
1 Campden tablet
1tsp of yeast nutrient
sachet of red wine yeast

I started the yeast with the yeast nutrient and some sugar in a cup of warm water to get it started. I then added the berries to the fermentation bin and mashed them with a potato masher to get some juice out. Then added the sugar and 1 litre of boiling water and stirred until the sugar dissolved. I then added the remaining ingredients and the yeast mixture. I also added a cup of strong tea to the blackberry mixture. This increases the tannins in the wine, but is not needed in the elderberry wine as there is already plenty of tannin present.


The yeast, sugar and yeast nutrient mixture

The blackberry wine in the fermentation bin

I then set the two fermentation bins beside a radiator to ferment. I put the lid loosely fitting on one and a tea towel over the over because it doesn't have a lid, or at least I can't find it. I put them there at about midday today and I have just checked them now at 7pm, no bubbles yet but there is a distinctive "homebrew smell" in the room. Hopefully there will be some fermentation signs in the morning. I will post another blog with more information when I am going to rack the wine into demijohns and post a link here.

EDIT: Here is the link to the update on the wines

All set for the yeast to do it's stuff

My next job of the morning was one I have been meaning to do for almost a year. When we got the pigs killed and butchered last year I set aside a half leg of pork to make prosciutto (or Parma ham). We got the pigs back from the butchers just before Christmas and I didn't have time to cure and hang the leg of pork. Then the summer came along and I didn't want to hang meat in the hot weather. It now looks like any risk of hot weather has passed for the year so I finally got around to it. I got my recipe from Michael Ruhlman's great book "Charcuterie; The Craft of Salting, Smoking, and Curing." It is a relatively simple recipe. It involves rubbing as much salt as necessary into the meat. I used about a kilo of salt. It was enough to get it all well covered in salt, concentrating on the parts where the flesh was exposed and rubbing some into the skin. I then placed the leg into a plastic container.


The salted leg of pork

The recipe says the it needs to be left in the salt for 1 day per 500g. My half leg of pork was a little under 3kg so it should be ready to come out in about 6 days. It says to keep an eye on it, remove liquid that comes from the meat and reapply salt as necessary. The recipe was for a full leg of pork, 6 or 7 kilos, so I will have to play it by ear a little with the timing I think. It also said it needs to be weighted with about 5 kilos on top of the leg. I don't know if this is related to the size of the leg or not but I have knocked together a weight on top of the leg in the fridge as you can see below.


When this comes out from the fridge in about a week it needs to be hung for a few months to air dry. The ideal location is 15 deg C and 60-70% humidity. I am thinking of hanging it in a cold room in the house which should be something close to those conditions. **here is the update on the prosciutto**

Yesterday I planted out a few potatoes that we saved from our early potatoes this year. They have gone into large pots in the polytunnel so hopefully we should have some fresh potatoes for Christmas dinner. I have never tried this before so I don't know it will work and it is probably fairly weather dependant. I have also started work on building my cider press. I have taken a few photos so far and the plan is to have a post about the cider press being built. Of course if the press doesn't work I will deny that I ever attempted to build one. But hopefully I will have it built by the weekend and the post up Sunday or Monday.

Until then.